Well, the crafty bug done gone and bit me!! Where's my after-bite?? hehe. SO I seriously got the itch to start sewing today, and that led to other crafty material things...I got a few little things done today. First thing, was a an external hard drive case for my sister in law. I made myself one and she liked it and asked me to make her one, so I did! And to be honest I think I did a better job this time than I did on my own! Plus I finally tried out stipple quilting...not too sure about that yet, I know I need lots of practice! So I started out with a material for front and back 15"x8" plus a thin needle punch batting.

I put them right sides together with the batting on the bottom, trimmed the corners for my flap with my triangle thingy (I'm all about proper terminology), then sewed around leaving an opening for turning.

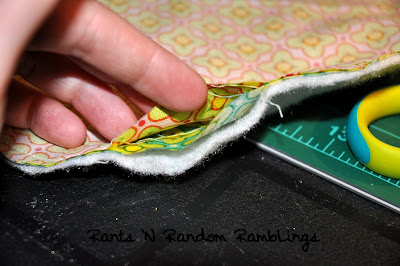 I tried my darning foot or hopping foot or whatever the heck that thing is called. (Again, proper terminology). The first try it didn't work (I thought I had it on wrong then realized that I just didn't put the presser foot lever down - duh!) So I ripped it out and tried again.
I did some loop-de-loos and even tried to make a couple hearts.
 The front looks OK, for my first try I thought, but something about the way the stitches look on the back bugs me. I found it really hard to keep my stitch length even, since this is free hand, and I'm not sure if that's why the back stitches look that way? I tried adjusting my tension but it only helped a little bit. Any ideas or suggestions? Can you see the stitching? I don't even know if I got a close enough shot of it for you.
Anyways, then I added a couple pieces of velcro to one end where the flap will close over.
 Then I folded it in half, to the point where the flap will bend over the top. (Right sides together). I sewed a seam up each side. Then I top stitched around the opening and flap, to give it a nice finished look. I wanted a separate compartment for the cord and for the hard drive, so I used masking tape to give me a nice line to follow (I'm all about using the right tools. hehe. My fabric pen wasn't really showing up on this fabric.) I straight stitched a line from the top of the pouch to the bottom.
 I added the other two velcro pieces to the flap to finish off the closure.
 And its done!
 Ready to go scrapbooking.
 Next have I ever mentioned that I love panels?? No?? Well, let me tell you, I love panels. They're the next best thing since sliced bread. Seriously. I went to the fabric store today to get some backing material and Chase came with me and once he got hold of this spongebob material, I couldn't pry it from his grubby little hands! He originally spotted some spongebob patterned cotton, and wanted me to make him a spongebob blanket. This kid has enough blankets to warm half of Alberta. I'm not even kidding, it annoys my husband to no end. So I convinced him to get this little pillow panel instead.
 I purchased a little red zipper and a pillow form as well. And let me tell you, that zipper wasn't as easy as I thought it would be, even with a zipper foot. (I mean really, does there HAVE to be a separate foot for every single thing? C'mon.) I probably didn't sew it on the way most people do. The hardest part for me was getting around the zipper pull. Knobby little thing. I attached it to one side of the panel first, then flipped it over and attached it to the other side.
 Then I sewed around the other three edges, pillowcase style, making sure to run over the tails of my zipper at the beginning and end.
 Flipped it inside out, and voila! Pillow is done, 4 year old is happy, and I got to be crafty. Everybody wins. I think the zipper turned out pretty well.
 Finished spongebob pillow. Chase slept with it tonight, and that always makes me feel great when he loves something I made for him.
 The last thing I made tonight is something I have been meaning to make since I first saw the tutorial HERE on Ashley's blog. Her button is also on the side of my blog if you ever need to click over there! She has so many cool tutorials for handy things around the house, and done in a way that is cost effective too! Rayna has quite a bundle of little barrettes already, and I mean little barrettes, I'm lucky if they're an inch long. They always end up on the bathroom counter after her bath and I am constantly trying to round them up so I don't lose them. This was the perfect solution! I picked up the frames at Zellers, 3-5x7 frames for $5!!
 I had quite a bit of Modge Podge on my hands by the time I was done, and I wrecked half of a fat quarter as I measured incorrectly the first time for my frame, but I'm so happy with the end result! I also added some little purple silk flowers on the corner just to dress it up a little bit. I hung it in the bathroom between the mirror and the bathroom cabinet. It fit perfect! I also managed to cover up a scrape in the drywall as the old metal bathroom stand we had, had a screw sticking out of the back that rubbed a hole in the drywall because the stand wasn't bolted to anything. So I killed two birds with one stone. (Well, no, not really, I love birds!) Please don't mind my mismatched towels, I can't help it if Chase loves Batman lol.
 Okay, well that's all folks! Thanks for reading, and if you have any tips for my stipple quilting, I would ♥ to hear them!

 I used Amber's "Someone To Love" kit, and a template from Crystal Wilkerson. Hopefully I can still get in on the challenge even though I can't get this posted in the gallery! And if you want to enter, hop over to Amber's blog to check it out :)