Anyways, I got out this weekend to get some shopping done, so I'm pretty much all set there except for my hubby, who I hope to finish off this week. Other than that, Christmas can come if it wants to!! I've got the perogies, cabbage rolls and meat pies in the freezer, so all is well. I even had a little time today to do some crafting, I decided to make Chase this really simple polar fleece neck warmer...only it turned out to be not so simple...for me!! (And if any of my crafty friends are reading this and can tell me what the heck I'm doing wrong, please step in, as I spent two hours picking stitches out, because I keep trying different ways to sew it together! This is how it starts out, and how I would like it to look, green around the one side, and the camo on the other. So the inside is one color, and the outside is another. I wanted to make sure all the seams ended up on the inside, so I sewed the ends of the green together, and I sewed the ends of the camo together, and slipped one inside the other and sewed the tube at the top and bottom, leaving a space for turning. But... When I turned it, this is what it looked like!! A narrow tube not large enough to fit over Chase's head!! And the colors aren't where they are supposed to be either, and there is a seam right in the middle!! AURGH! I totally took these pictures thinking I was going to post a cute little tutorial on how to do this, then realized I couldn't even figure it out myself. I'm totally going to email my pal Ashley at Make it and Love it and see if she can tell me how to do this!!! Seriously, such a simple concept and I have buggered it up beyond the point of it being worth it! I just want to go buy one for $8 and say forget it! lol. Ashley, help a girl out, won't you? Look, I'm pathetic. lol.
 In other news, Cheri at Dream Big Designs has a freebie collab kit on her blog this week, so cyber run over there and check it out! The bright colors are so much fun.
 Here is my layout, you may not be able to read the journalling, but it just talks about what a sassy little girl my daughter is becoming!!
 Also, the girls at Scrap that Idea have a great shopping incentive, or deal, or whatever you want to call it! Check this out:

When I turned it, this is what it looked like!! A narrow tube not large enough to fit over Chase's head!! And the colors aren't where they are supposed to be either, and there is a seam right in the middle!! AURGH! I totally took these pictures thinking I was going to post a cute little tutorial on how to do this, then realized I couldn't even figure it out myself. I'm totally going to email my pal Ashley at Make it and Love it and see if she can tell me how to do this!!! Seriously, such a simple concept and I have buggered it up beyond the point of it being worth it! I just want to go buy one for $8 and say forget it! lol. Ashley, help a girl out, won't you? Look, I'm pathetic. lol.In other news, Cheri at Dream Big Designs has a freebie collab kit on her blog this week, so cyber run over there and check it out! The bright colors are so much fun.Here is my layout, you may not be able to read the journalling, but it just talks about what a sassy little girl my daughter is becoming!! Also, the girls at Scrap that Idea have a great shopping incentive, or deal, or whatever you want to call it! Check this out:
 I made this delicious Citrus
 Then I took the seeds and did this with them:
 I used a recipe I found on the
 And here is Rayna as the cutest little ladybug ever.

 I also made these cute
 This one I just used patterned fabric, and used jumbo
 Then I used
 So that's what I've been up to the last few days. I actually did some crafty stuff!!


 Of course I searched for the
 The one handle is longer, as it slips through the other one to carry. Cute, right? I know! (Can you hear Monica from Friends saying "I know!"? Or is it just me?

 Now I put pockets on mine, so while it is reversible, I'd look like a dork carrying it this way, plus I'd lose stuff. This is just for show and tell.
 The pockets are a good size, but I honestly think I'd leave them off next time, as I don't use them as much as I thought I would. Now a little pouch with a zipper would be a different story. But I don't know how to do that, so I would have no pockets. SAY NO TO POCKETS!!
 So if you would like the pattern just go
 His fingers stayed blue til the next day's bath!
 And here is what we brought back, two of which I took home! Not a bad haul for three hours work!
 So I quickly looked up a recipe and made
 And topped it with vanilla ice cream:
 Want the recipe for this

 Which I would then use to make
 Well that's about it. That's what happens when I don't post for two weeks! I still have more to show you too! I will sign off with a little question for anyone that has upgraded their
 I put them right sides together with the batting on the bottom, trimmed the corners for my flap with my triangle thingy (I'm all about proper terminology), then sewed around leaving an opening for turning.

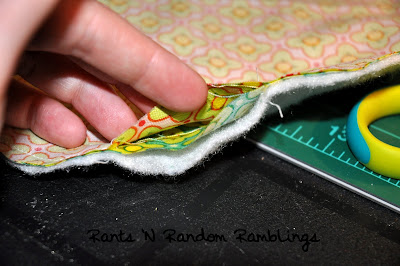 I tried my darning foot or hopping foot or whatever the heck that thing is called. (Again, proper terminology). The first try it didn't work (I thought I had it on wrong then realized that I just didn't put the presser foot lever down - duh!) So I ripped it out and tried again.

 The front looks OK, for my first try I thought, but something about the way the stitches look on the back bugs me. I found it really hard to keep my stitch length even, since this is free hand, and I'm not sure if that's why the back stitches look that way? I tried adjusting my tension but it only helped a little bit. Any ideas or suggestions? Can you see the stitching? I don't even know if I got a close enough shot of it for you.

 Then I folded it in half, to the point where the flap will bend over the top. (Right sides together). I sewed a seam up each side. Then I top stitched around the opening and flap, to give it a nice finished look. I wanted a separate compartment for the cord and for the hard drive, so I used masking tape to give me a nice line to follow (I'm all about using the right tools. hehe. My fabric pen wasn't really showing up on this fabric.) I straight stitched a line from the top of the pouch to the bottom.
 I added the other two velcro pieces to the flap to finish off the closure.
 And its done!
 Ready to go scrapbooking.
 Next have I ever mentioned that I love panels?? No?? Well, let me tell you, I love panels. They're the next best thing since sliced bread. Seriously. I went to the fabric store today to get some backing material and Chase came with me and once he got hold of this spongebob material, I couldn't pry it from his grubby little hands! He originally spotted some spongebob patterned cotton, and wanted me to make him a spongebob blanket. This kid has enough blankets to warm half of Alberta. I'm not even kidding, it annoys my husband to no end. So I convinced him to get this little pillow panel instead.
 I purchased a little red zipper and a pillow form as well. And let me tell you, that zipper wasn't as easy as I thought it would be, even with a zipper foot. (I mean really, does there HAVE to be a separate foot for every single thing? C'mon.) I probably didn't sew it on the way most people do. The hardest part for me was getting around the zipper pull. Knobby little thing. I attached it to one side of the panel first, then flipped it over and attached it to the other side.
 Then I sewed around the other three edges, pillowcase style, making sure to run over the tails of my zipper at the beginning and end.
 Flipped it inside out, and voila! Pillow is done, 4 year old is happy, and I got to be crafty. Everybody wins. I think the zipper turned out pretty well.
 Finished spongebob pillow. Chase slept with it tonight, and that always makes me feel great when he loves something I made for him.
 The last thing I made tonight is something I have been meaning to make since I first saw the tutorial
 I had quite a bit of Modge Podge on my hands by the time I was done, and I wrecked half of a fat quarter as I measured incorrectly the first time for my frame, but I'm so happy with the end result! I also added some little purple silk flowers on the corner just to dress it up a little bit. I hung it in the bathroom between the mirror and the bathroom cabinet. It fit perfect! I also managed to cover up a scrape in the drywall as the old metal bathroom stand we had, had a screw sticking out of the back that rubbed a hole in the drywall because the stand wasn't bolted to anything. So I killed two birds with one stone. (Well, no, not really, I love birds!) Please don't mind my mismatched towels, I can't help it if Chase loves Batman lol.
 Okay, well that's all folks! Thanks for reading, and if you have any tips for my stipple quilting, I would ♥ to hear them!